High Quality Custom Awnings for theDo-It -Yourself Home-Owner |
|
| Home | | | About Us | | | | | My Account | | | Support | | | Search |
|
Allegro Awnings Standard Awning Installation
Congratulations – You have made an excellent decision and will soon be enjoying a more beautiful home or business, and lower electric bills while you protect your carpet and furniture. These instructions will make the installation of your new Allegro Awnings fast and easy. By taking the time to become familiar with the installation of your Allegro Awnings before beginning, you will benefit from our many years of experience and input from hundreds of customers and dozens of improvements to these instructions. These instructions address the questions we have received over the years from college students to senior citizens, builders to housewives, and handymen to the mechanically challenged. The most common questions we receive today are addressed a few pages later in this installation manual. We cannot stress enough the importance of becoming familiar with this entire document BEFORE beginning your installation. The time you spend doing this is well spent and will make installing your Allegro Awnings quite simple. You will also do it correctly the first time and ensure many, many years of enjoyment. Basic Tools Needed for InstallationTape Measure & Pencil Level (Optional but recommended) Drill Adjustable Wrench Drill Bits (1/4 “) Ladder Screwdriver
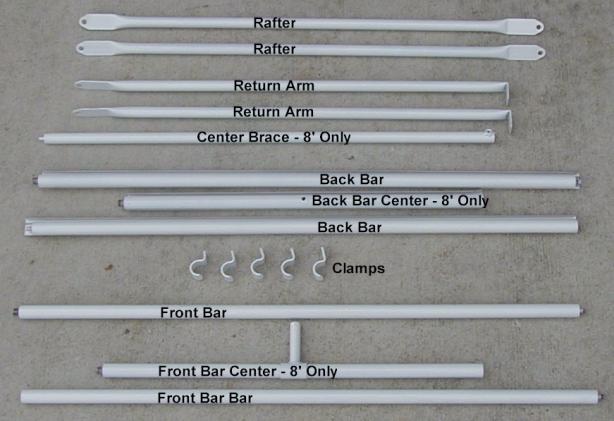
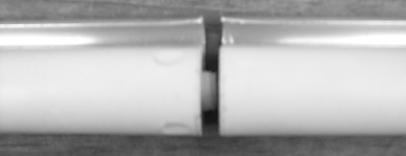
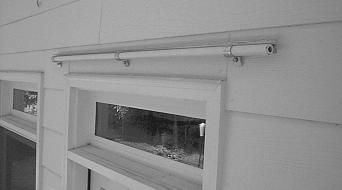
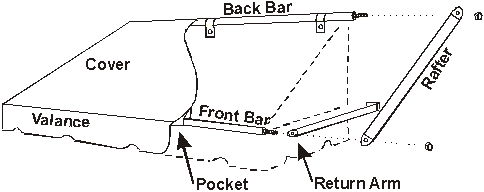
See the list of parts in Figure 1. Become familiar with each part before you begin. FIGURE 1 Layout of the Installation LocationThe first step in installing your Allegro Awning is to determine where you will mount the back bar. It will need to be installed level and centered over the window or door. If the door or window opens outward, the awning must be high enough to provide clearance with the door or window in the open position. In some cities and counties there are building codes that specify how awnings can be mounted. Please check with local authorities for clarification. Examine where you will be mounting your awning. If you are mounting to any surface that is not concrete, refer to Figure 2 for typical locations of studs and headers. The framing members outlined in gray will provide an appropriate anchoring point for the fasteners. This is what you would see if you removed the siding from a framed wall. FIGURE 2 On masonry walls drill and insert anchors for the mounting screws. For other surfaces, locate the studs for anchoring the clamps with the supplied screws. Assemble the two back bar parts (three on the 8’). The ends with the aluminum channel flush to the pipe (Figure 3) should be joined together. Screw together snugly and then align the aluminum channel. The gap shown below will be gone after tightening and mounting to the wall. FIGURE 3 Position the back bar to the correct height above the window or door. Mark the center of the window or door to make sure the awning is centered. FIGURE 4 Ensure the back bar is level and fasten the clamps tightly to the wall. Assembly of the Allegro AwningsThe completed Allegro Awnings assembly is shown below in Figure 5. FIGURE 5 Slide the rope sewn into the back edge of the cover into the back bar on the wall. You may need to use a screwdriver to slightly open the channel at each section if the fabric catches on the edges.Assemble the front bar and slide it into the front pocket of the cover. Hold the front bar out from the wall to loosen the fabric and install a rafter connecting the back bar to the front bar. Raising the front bar to the same height or above the back bar may be required. A second person to hold the front bar out and level may be needed on larger awnings. Loosely fasten a nut at each end of the back bar to hold the rafter in place.
Slide the return arm into the pocket on the side panel of the awning. Make sure the mounting is facing the inside of the awning. Loosely fasten a nut at each end of the front bar to hold the rafter and return arm in place. Level the return arms fasten the end of the return arms to the wall. Pull the return arms down firmly to further tension the fabric before fastening. The last step is to tighten the frame bolts. Install Center Brace - 8’ Allegro Awnings Only: Slide the open end of the center brace over the stub on the center section of the front bar. Insert the pin on the opposite end into the hole in the center section of the back bar. Place as much tension on the fabric as possible and secure the center rafter with the fastener. Congratulations - Your Allegro Awnings installation is now complete! If you would like a waterproof seal at the wall, use a non-adhesive caulk to seal the aluminum channel to the wall. This is not recommended if you will be removing the awning each season. We hope that your installation went as smooth and easy as we have designed into the Allegro Awnings. We love to hear from our customers and look forward to your feedback at www.Allegroawnings.com or Toll Free in the USA at 877-Allegro. | ||||||